
Business hours are not just about when you're working; they make your entire operation run smoother. Your workflows and automated processes all work better when they know your schedule. You can also add custom holidays so your system with respect respects your time off.
Getting Started with Business Hours
Just navigate to Settings > Automation Section > Business Hours > Add New Business Hours and you are ready to customize your availability.

Time Zone
First things first, set your time zone so everything aligns with when your business actually operates.
Help Desk Hours
This is where you define when your agents are ready to support customers through any communication channels. You have two great options:
- 24/7 Support: If your agents are always available, just select this option and you're done.
- Custom Schedule: If you prefer a work-life balance? Set specific hours for each day of the week.
- Start Time – When will your team start resolving customer issues?
- End Time – When do you wrap up for the day?
Recommendation: Do mix and match, like open longer on weekdays and shorter on weekends, or closed entirely.
Yearly Holiday list
Enable the Yearly Holiday List feature to add custom holidays based on your business policies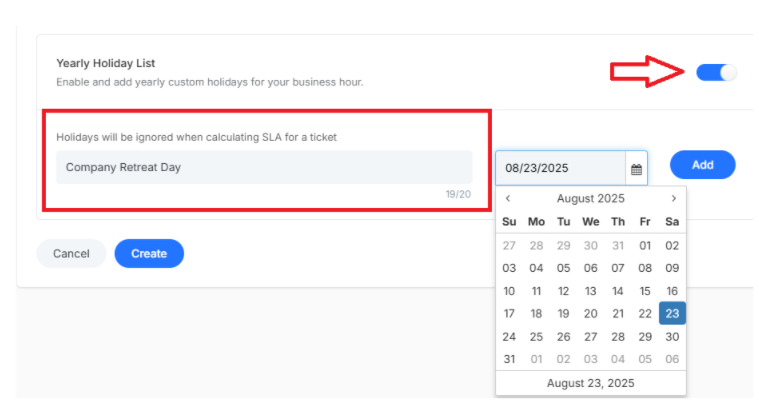
Step 1: Give your holiday a name (for example, "Company Retreat Day")
Step 2: Pick the date from the calendar
Step 3: Click Add and your holiday is officially on record
Important: Your system will now turn these days off and adjust workflows accordingly
How to Delete a Business Hour
While editing business hours, you will see a "Delete Business Hours" button

Click it and confirm that this will permanently remove those hour settings.
Warning: Remember, this action can't be undone, so make sure you really want to delete
What's next?
Now that your business hours are set up, let's keep optimizing your service process:
- Creating Routing Rules: Automatically direct customers to the right agent
- Set up your SLA policies: Establish an SLA that works with your business hours for a realistic experience